Guides / Process
In-Die Tapping: Threads, Sensors and Die Protection Inside a Progressive Die
October 28, 2026
A threaded hole on a stamped part usually means another operation. The part leaves the press, goes into a bin, then to a tapping machine where an operator or a fixture feeds it again. In-die tapping removes that step by tapping the hole inside the progressive die while the strip is still moving through it. The part comes off the press with the thread already cut or formed, and the cost of the second operation, the handling and the extra inventory disappears.
The tradeoff is a more complex die. A tapping unit sits in the tool, sensors watch for faults and the line runs more slowly than a die without taps. This guide covers when in-die tapping works, how the tap and sensors are set up and what to put on the RFQ.
How in-die tapping works
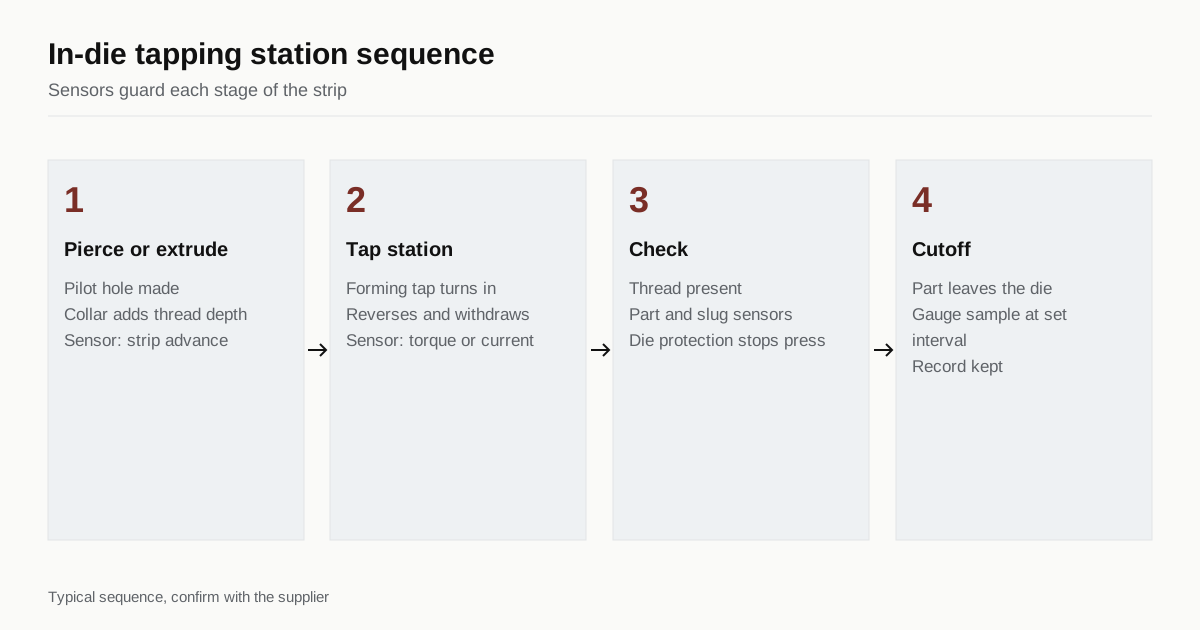
In a progressive die, the strip steps forward one station per stroke. Early stations pierce a pilot hole and the hole that will become the thread. At a later station, a tapping unit mounted in the die moves a tap into the hole. The tap turns, cuts or forms the thread to depth, reverses and withdraws. The strip then advances, and the part continues to the cutoff.
There are two common ways to drive the tap:
- Cam or press-driven units use the motion of the press stroke to turn the tap through a gear or rack. They have no separate power source but are tied to press speed and stroke length.
- Motor-driven units use a servo motor or a pneumatic or electric drive mounted on the die. They give the shop control over speed, depth and reverse, and they can monitor torque.
Either way the tap works while the strip is held in place by the die, so the thread position stays tied to the other features of the part.
Cutting taps and forming taps
A cutting tap removes material and leaves chips. In a die, chips are a problem. They can fall into the cavity, jam the tap or end up between a punch and the strip, so cutting taps in a die need a chip-clearing method such as an air blast or vacuum.
A forming tap, also called a roll tap, displaces material outward and forms the thread by cold working it. There are no chips, which is why forming taps are the common choice in a die. They need a slightly different hole diameter than a cut tap, and they suit ductile material such as low carbon steel, aluminum and soft brass. Hard or brittle material may crack. The thread formed this way is often stronger in tensile terms because the grain flows with the thread profile, though the thread crest can look different from a cut thread. If your print calls for a thread class that depends on form, ask the shop to confirm it can hold the class with a forming tap.
Thread depth and thin material
Threaded hole strength depends on how many thread turns are engaged. A thin strip offers a short path. A strip 1 mm (0.040 inch) thick with an M3 thread has well under two full turns if the hole is simply pierced and tapped. That is weak, and screws strip out.
The common fixes are:
- Extruded holes. A punch pulls the material around the pilot hole into a short collar. The collar adds length, so the same strip can hold several turns. Extruding is a forming operation and fits in the die before the tap station.
- Thicker material, if the design allows it.
- A self-clinching nut or insert, pressed in at a later station or as a secondary operation.
- A thread-forming screw, chosen so the screw makes its own thread in the hole.
Shops often look for several pitches of engagement when strength matters. Ask the shop to state how many turns it expects, and set your own requirement from the load the screw must carry.
Line speed and lubrication
A tap needs time. It must turn in, turn out and clear the hole before the strip can step forward, and that sets a ceiling on the stroke rate. Dies without taps may run at several hundred strokes per minute. A die with a tapping unit often runs well below that, and the shop sets the rate from the thread size, the depth and the tap drive. Servo-driven units can be tuned for the material, while cam-driven units follow the press.
Lubrication matters more here than in a plain blanking die. Forming taps need oil to reduce friction and heat, and a dry tap wears fast. Shops use a controlled oil feed or a mist at the tap station, which means the part may carry oil residue. If your assembly needs clean parts, say so on the print, and expect a wash step after stamping.
Maintenance and tool life of the tap
Taps wear, and they break. A forming tap in steel may run tens of thousands of holes before it needs replacing, though the figure depends on the material, the oil and the thread depth. Aluminum is gentler on taps than stainless steel. Ask the shop how it tracks tap life, whether it changes taps on a count or by inspection and whether spare tapping units are kept for the tool. A tap that drifts out of size produces threads that fail the gauge, and a tap that breaks inside the strip can stop the line while the broken piece is cleared. Good die records make that routine, and the same records feed the stamping die maintenance plan.
In-die tapping versus a separate operation
| Factor | In-die tapping | Secondary tapping |
|---|---|---|
| Die cost | Higher, tapping unit and sensors added | Lower |
| Piece price at volume | Often lower, no extra handling | Higher, extra labor and handling |
| Line speed | Slower than a die without taps | Press runs at full speed, tapping runs separately |
| Setup | Part of die setup | Separate fixture and machine setup |
| Thread position | Fixed by the die | Depends on fixturing |
| Suitable volume | Medium to high | Low to medium |
| Risk | Tap breaks inside the die | Handling damage and mixed lots |
These are typical comparisons. At low volume the added die cost rarely pays back, while at higher volume the saved handling usually does.
What die sensors do
A progressive die runs at speed and the cost of a fault is high. A short feed, a slug that pulls up or a broken tap can wreck the die in one stroke. Die sensors watch for these faults and stop the press before damage. Typical sensors include:
- Misfeed or short feed sensors that confirm the strip has advanced the right distance
- Pilot detection that checks the pilot pin enters the hole freely
- Slug detection that senses a slug left on the die surface
- Part-out sensors that confirm each part has left the die
- Strip buckle and end-of-strip sensors that catch a jam in the strip path
- Tap monitoring, which can read motor current or torque, or use a sensing pin to check that the thread exists and is open
A die protection controller collects the signals and stops the press on the first fault. Some shops also fit a tonnage monitor on the press columns to catch an unusual load, such as a double blank or a worn punch.
None of this appears on the print, but it affects the quality you receive. A thread that is missing, short or off position gets caught at the die instead of in your incoming inspection.
Inspecting threads
Even with sensors, thread inspection continues:
- Go and no-go thread gauges are the standard check, used at setup and at set intervals during the run.
- Thread position and depth are checked against the print with a pin gauge or a fixture.
- Torque tests may apply to critical joints, where the screw must meet a minimum strip-out torque.
Ask the shop how often it samples and how it records the results. For parts that go into safety assemblies, the PPAP and IATF primer explains the documents buyers commonly request.
When in-die tapping is a poor fit
In-die tapping is not for every job:
- Low volumes, where die cost cannot be spread
- Very thin strip with no room for an extruded hole
- Hard materials that crack under a forming tap
- Parts with threads that the die cannot reach, such as holes in a vertical wall
- Blind threads that need a deeper tap than the die allows
In those cases a secondary operation, a clinch nut or a thread-forming screw is often the better answer. The guide on secondary operations after stamping compares the options.
What to put on the RFQ
State what you need so the shop can choose a route:
- Thread size, pitch and class
- Required depth or number of engaged turns
- Material, temper and thickness
- Whether a forming tap is acceptable
- Annual volume and lot size
- Gauging and inspection requirements
- Any torque or pull-out requirement
Add whether you accept an alternative, such as an extruded hole or a clinch nut, and ask the shop to quote both routes. The metal stamping RFQ checklist covers the other fields.
Checklist before you choose in-die tapping
- Check that the strip gives enough thread depth, or plan an extruded hole.
- Pick a forming tap for ductile material.
- Confirm the volume justifies the added die cost.
- Ask which sensors protect the die and how tap breaks are caught.
- Agree on gauge checks and record keeping.
- Compare the quote with a secondary tapping route.
When the print is ready, send the RFQ and receive shop replies within 24 business hours.
See also: the progressive die stamping reference.
Frequently asked questions
Can any stamped part have in-die tapping?
No. The part needs enough material around the hole, a strip that stays in position during the tap and a tapping unit that fits in the die. Very thin strip often needs an extruded hole to give enough thread depth. The shop decides during die design.
What is the difference between a forming tap and a cutting tap?
A cutting tap removes material and leaves chips. A forming tap pushes the material outward to form the thread and leaves no chips. Forming taps suit ductile materials and in-die use, since chips inside a die are a hazard.
Do die sensors slow production?
They add a small setup cost and a few milliseconds of checking, but they stop the press when something is wrong, which prevents a crash that would cost far more in die repair and lost time.
Need a quote for this part?
Send the print. We match you with up to 3 stamping shops and reply within 24 business hours.
Send my RFQ