Guides / Process
Stamping Burr Height: What Limit to Put on the Print and How Shops Measure It
November 3, 2026
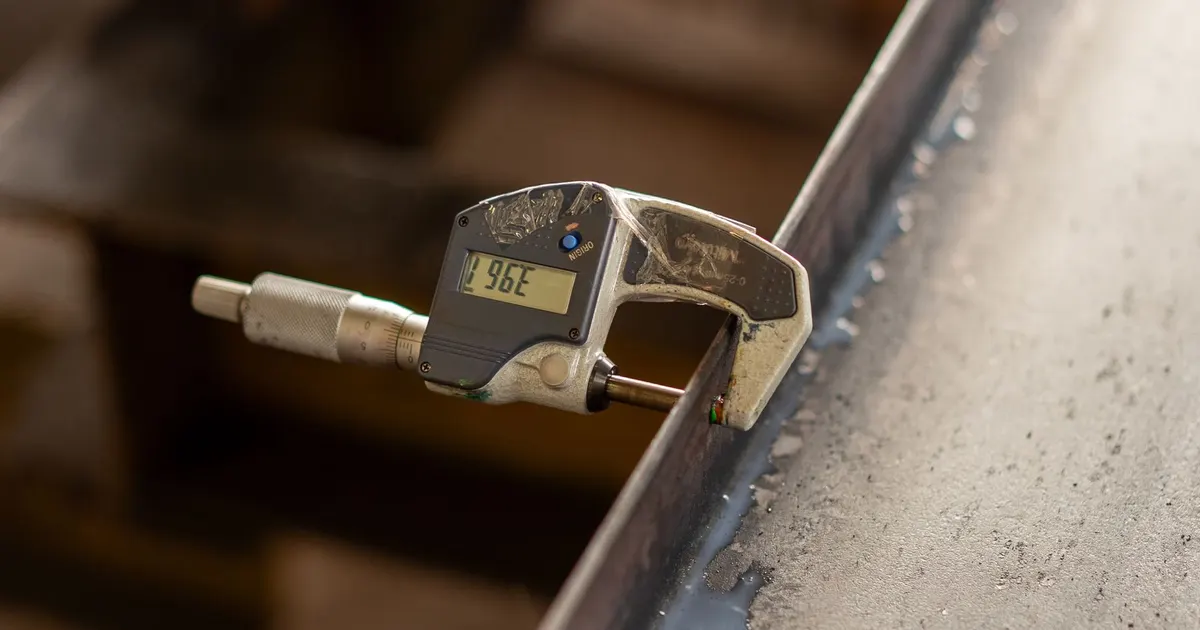
A burr is the raised ridge that stays on a stamped edge after the punch has passed. Every blanked or pierced edge has one. A small burr is harmless on a bracket that nobody touches. A large one cuts a hand, shorts a lamination stack, pierces insulation on a busbar or stops a part from seating. The print is where a buyer decides how much burr is acceptable, and a vague note such as “deburr all edges” leads to disputes at incoming inspection.
This guide explains where burrs come from, the limits buyers commonly use, how shops measure them and how to write the callout so that the shop quotes the right process.
Where a burr comes from
When the punch enters the sheet, the material first bends and rounds over a small shoulder called die roll. The punch then shears a clean band, and finally the remaining material tears away. The tear leaves a ridge on the side where the punch exits, and that ridge is the burr.
Four things control its size:
- Die clearance. The gap between punch and die, typically several percent of the thickness on each side. Too little clearance gives a second shear band and a secondary burr. Too much gives a large rollover and a taller burr.
- Tool sharpness. A dull edge pushes material instead of cutting it. Burr height grows steadily as the tool wears.
- Alignment. If punch and die are not centered, the clearance is uneven, and one side of the cut carries a larger burr.
- Material. Soft, ductile materials such as aluminum and copper form taller burrs than harder steels at the same clearance, while very hard materials chip.
For this reason a burr limit is partly a promise about tool maintenance. A shop that sharpens on schedule holds a lower burr than one that runs the die to failure. See stamping die maintenance and tool life for the questions to ask.
Typical burr limits
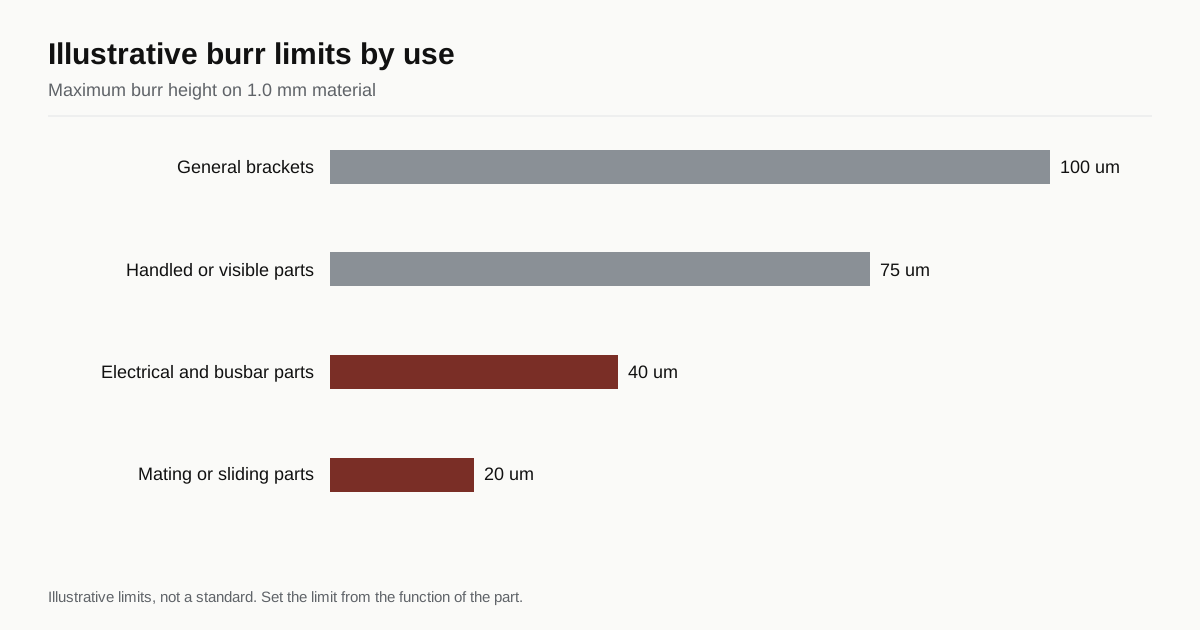
Burr limits are usually written as a height, either in millimeters or as a percentage of material thickness. A common general rule is a maximum burr of about 10 percent of thickness. Tighter limits apply when the use demands it.
| Use of the part | Typical burr limit | Notes |
|---|---|---|
| General brackets, covers, unseen parts | About 10 to 15 percent of thickness | Normal die condition holds this |
| Handled or visible parts | About 5 to 10 percent of thickness | May need light tumbling |
| Electrical contacts, busbars, laminations | Often 0.02 to 0.05 mm or less | Burr can short or pierce insulation |
| Parts that mate or slide | As low as 0.02 mm | May need shaving or fine blanking |
These are typical figures from common practice, and they are not standards. Choose the limit from the function of the part. Over-specifying adds cost without adding value.
Which side the burr sits on
A burr has a direction, and the print should say which way it must face. On a blanked part, the burr usually forms on the side opposite the punch entry, the die side. On a pierced hole, it forms on the exit side, often the side the slug leaves. Where the burr sits matters:
- A burr on the mating face stops a part from seating flat.
- A burr facing a handler leads to cuts.
- A burr facing a wire or insulation can damage it.
- A burr on the visible face is a cosmetic issue.
Designers can often ask for a burr direction at no cost, because the shop can run the strip in either orientation during die design. Put an arrow or a note on the print, such as burr down or burr on the side opposite the marked face. Changing direction after the tool is built can mean a new die, so decide early. The page on common metal stamping defects shows how burr relates to other edge faults.
How shops measure burr height
Measuring a burr is harder than it sounds, because the burr is small and its tip is soft. Common methods are:
- Micrometer or height gauge. The shop measures the thickness at the edge with and without the burr, or sets the part on a flat plate and reads the burr height with an indicator. It is fast but depends on the operator.
- Optical comparator. A projected profile shows the burr as a silhouette, and the shop reads the height against an overlay. Good for small parts.
- Microscope with a calibrated scale. Measures burr height directly on the edge. Common for thin parts and electronics.
- Optical 3D or stylus profilometer. Records the edge profile, including die roll and burr, and gives repeatable numbers. Used where limits are tight.
- Cross section. The shop cuts and mounts a sample, polishes it and measures burr, die roll and sheared band. This is the reference method, but it destroys the part.
Touch and visual checks, such as running a fingernail or a cloth across the edge, are quick screens, but they give no number. Agree on a method for inspection, and write it in the quality plan. A burr limit with no method is open to argument.
Marking burr on the print
Use clear notation. The standard ISO 13715 covers how to indicate edges of undefined shape, including burr and rollover, and many companies adopt it. Without a standard, a plain note works:
- State the maximum burr height as a number.
- State the direction or the face that must stay flat.
- Say which edges the limit covers, and which can be looser.
- Say how it is measured, if the limit is tight.
Apply the tight limit only where it is needed. A part with three critical edges and eight others should show that difference, because the shop can then plan the die and the process accordingly. Related guidance appears in metal stamping tolerances and what costs extra.
Burr growth over a production run
A die does not hold the same burr from the first part to the last. When the tool is freshly sharpened, the burr is small. As the cutting edges round over, the burr rises, slowly at first and then faster as wear accelerates. A shop that inspects the first off, then sets a check interval, can catch the rise before parts go out of limit. A shop that checks only at setup finds the problem when the customer does.
Ask how often the shop measures burr during a run, what count triggers a sharpening and whether the sharpening interval is recorded for each die. A well-run shop sets the sharpening point well below the limit, so that the parts at the end of a run still pass. For high volume jobs, request a control chart or a record of burr readings over time, which shows the trend in numbers instead of a pass or fail note.
Burr and material
The same die clearance gives different burrs on different metals. Soft materials such as aluminum, copper and annealed brass tend to roll and tear, forming taller and more ductile burrs that bend instead of snapping off. Harder materials such as spring steel and full hard stainless form thin, brittle burrs and chip more easily, which shows up as a rough edge instead of a tall ridge. Coated strip adds another case, because a coating can flake near the cut and leave a burr with an exposed core.
Because of this, a burr limit that is easy on steel can be hard on aluminum. If you move a design from one material to another, review the burr callout and ask the shop to confirm it still holds. See the material guides on stainless steel stamping and aluminum stamping alloys for how each behaves in the die.
When deburring is needed
If the die cannot hold the limit with normal maintenance, the shop adds a deburring step:
- Tumbling or vibratory finishing, where parts rub against media and break edges. Cheap per part but can affect dimensions and finish.
- Brushing or belt deburring, which works on flat edges and is more controlled.
- Shaving, a second die that trims a thin layer from the edge for a smoother cut.
- Electropolishing, for stainless parts where a clean edge and surface are needed.
- Manual deburring, used for low volume or complex edges.
Each adds cost, handling and a risk of damage, and some leave the edge rounded instead of sharp. If the function needs a sharp edge, say so. Deburring after plating also removes coating, so sequence matters. The guide on secondary operations after stamping covers that decision.
What to put on the RFQ
Give the shop:
- The burr limit as a number, with direction
- Which edges it applies to
- The measurement method, if tight
- Material, temper and thickness
- Plating or coating plans that interact with deburring
- Annual volume and any change expected as volume grows
A shop that sees the limit and the volume can choose between a well-maintained die and a secondary step. The metal stamping RFQ checklist covers the other fields.
Checklist for a burr callout
- Decide the function that burr affects.
- Write a maximum height as a number.
- State the burr direction on the print.
- Limit the tight callout to the edges that need it.
- Name the measurement method.
- Ask each shop how it holds the limit, by die maintenance or by deburring.
When the print is ready, send the RFQ and compare replies within 24 business hours.
See also: the fineblanking reference: press forces, edge quality and materials.
Frequently asked questions
Can a stamped part be completely burr free?
Not straight from the die. Every cut edge has some burr, and the question is how large it is and which side it sits on. A print that says burr free is usually read as no burr that can be felt or that exceeds a stated limit. State a number.
What is a typical burr limit?
A common general limit is about 10 percent of material thickness, with tighter limits of 5 percent or less for handled parts, electrical parts and laminations. These are typical, not rules. The limit should come from how the part is used.
Who pays for deburring?
The piece price carries it. A burr limit the die can hold with normal maintenance costs little extra. A limit that needs tumbling, brushing or a shaving step adds a process, and the quote should show it.
Need a quote for this part?
Send the print. We match you with up to 3 stamping shops and reply within 24 business hours.
Send my RFQ